- Overview: the app's two areas
- UN number search
- View packing instruction details directly in the search
- Create a DGD — Step 1: AWB & addresses
- Step 2: Training certification
- Step 3: Add dangerous goods entries
- Step 4: Preview & export
- Shipping labels (10×12 & A4)
- Company admin: employees & licences
- Frequently asked questions
- Support chat
Overview
Two areas, one goal: a correct Shipper's Declaration for Dangerous Goods (DGD for short).
GS DGR (Beta) has two main areas, which you can switch between using the two round buttons above:
The sections below walk through both areas in order.
UN number search
Quickly look up what's allowed for a UN number — no need for the DGD wizard.
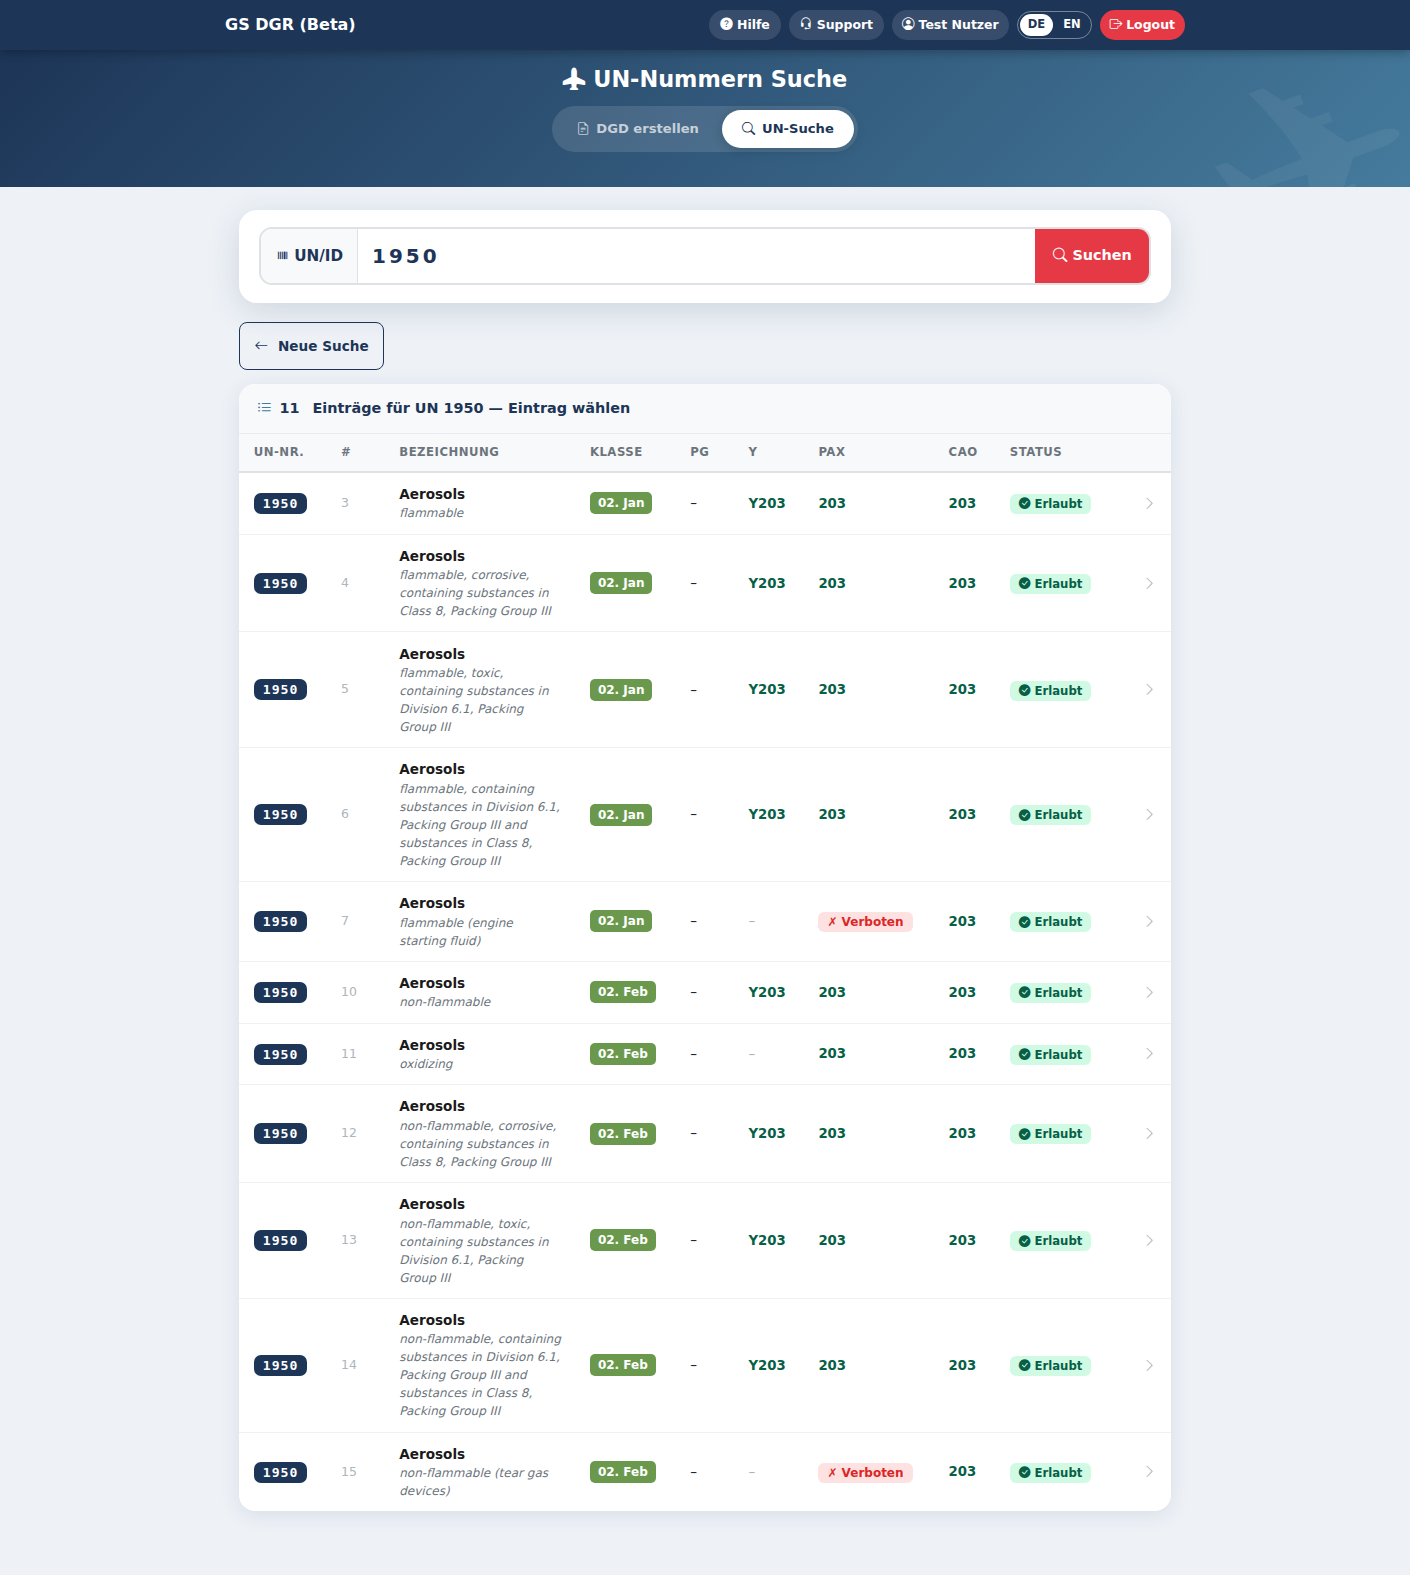
Enter a UN/ID number in the search field above (e.g. 1950) and click Search. If there are several variants for that number (e.g. different aerosol types), a list appears first for you to choose from.
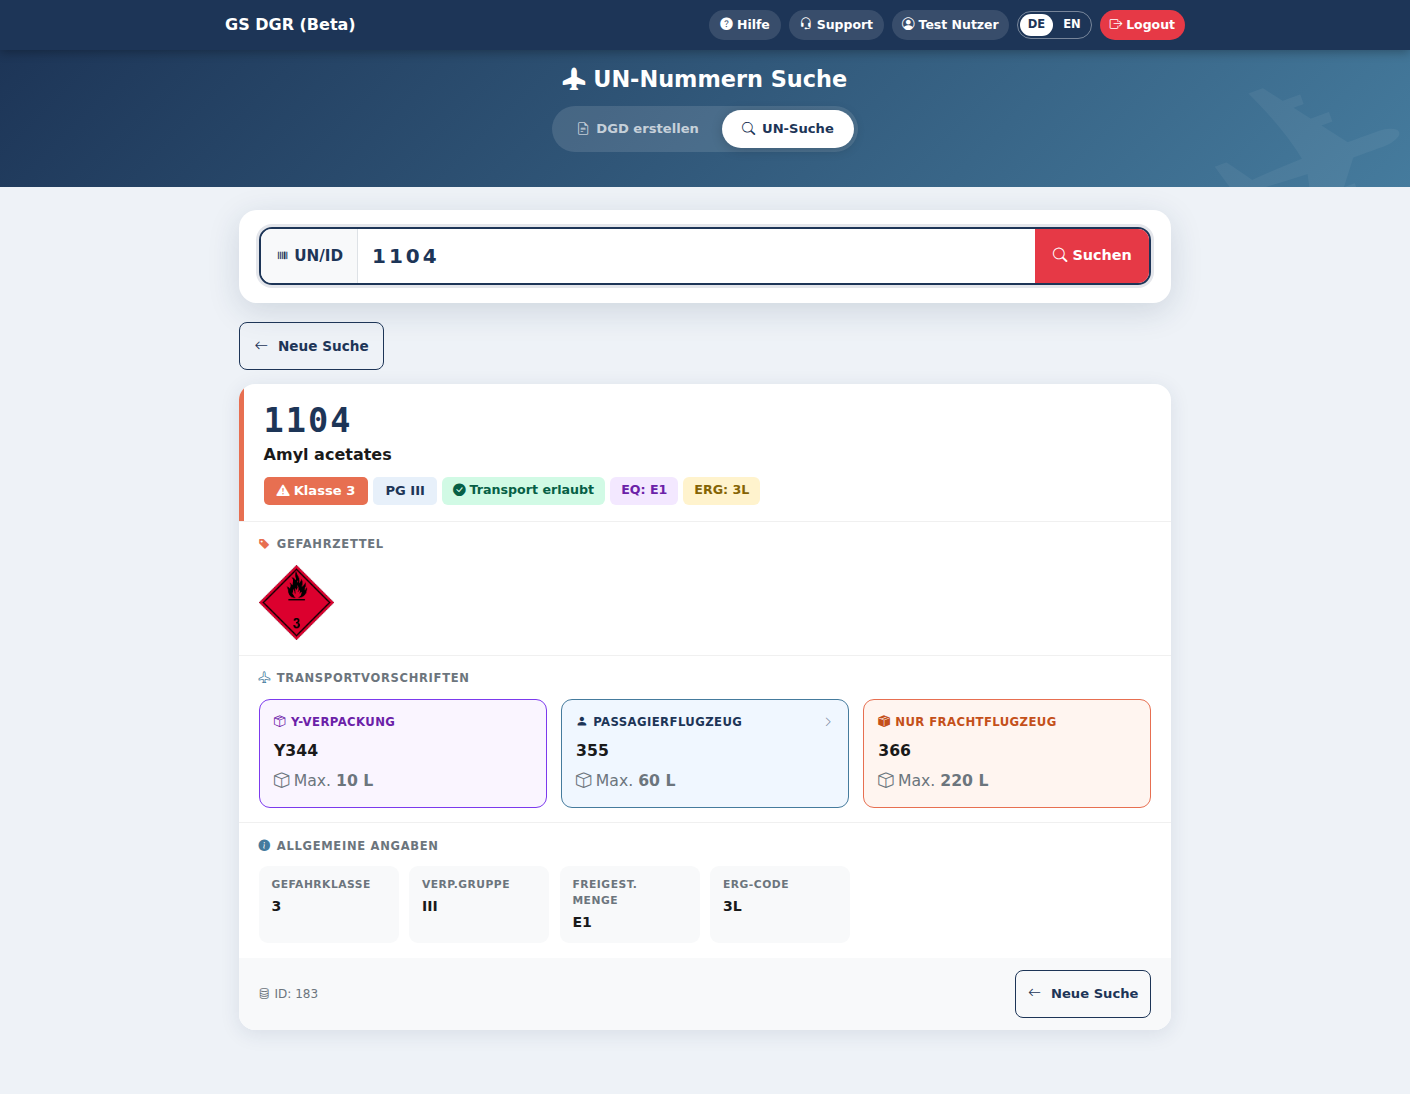
The detail view shows class, packing group, hazard labels, and — importantly — the three transport rules for Y-packing, passenger aircraft (PAX), and cargo-aircraft-only (CAO), each with its allowed packing instruction (PI) and maximum quantity.
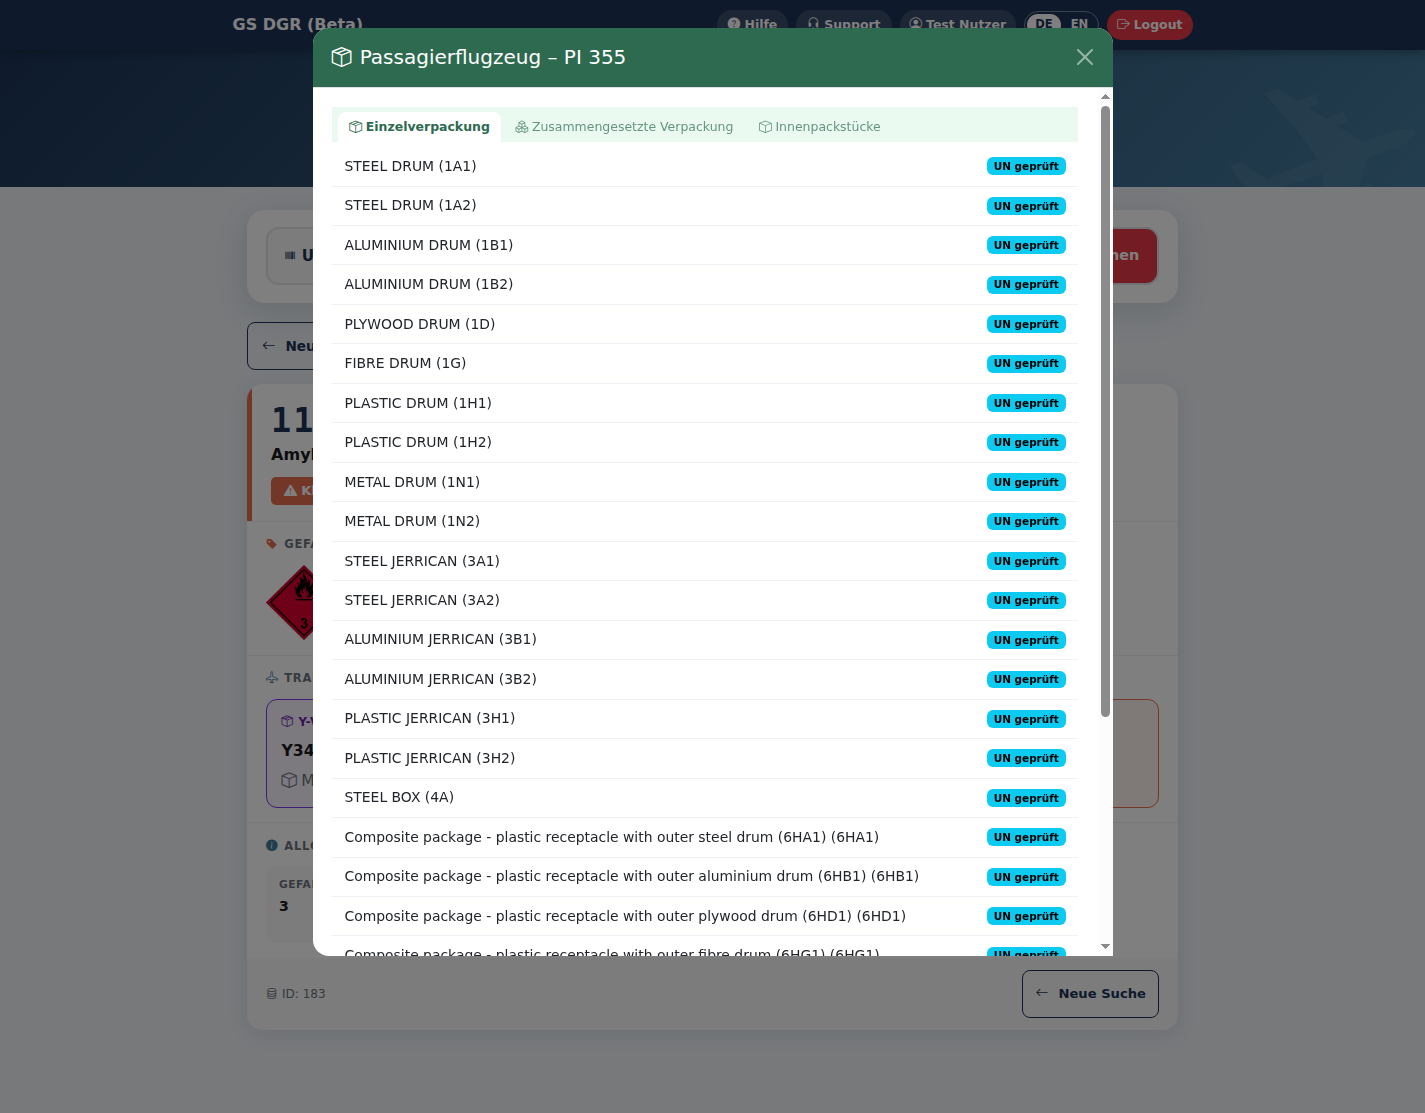
View packing instruction details directly
If more detail is stored for a packing instruction (PI), the whole tile is clickable.
If details on allowed packaging are stored for one of the three transport rules (Y / PAX / CAO), you'll see a small arrow on the right of the tile. Click anywhere in the tile — a window opens with three tabs: Single packaging, Combination packaging, and Inner packagings. This is a pure reference view; nothing is selected here.
Create DGD — Step 1: AWB & addresses
Air waybill, house AWB, and the shipper and consignee addresses.
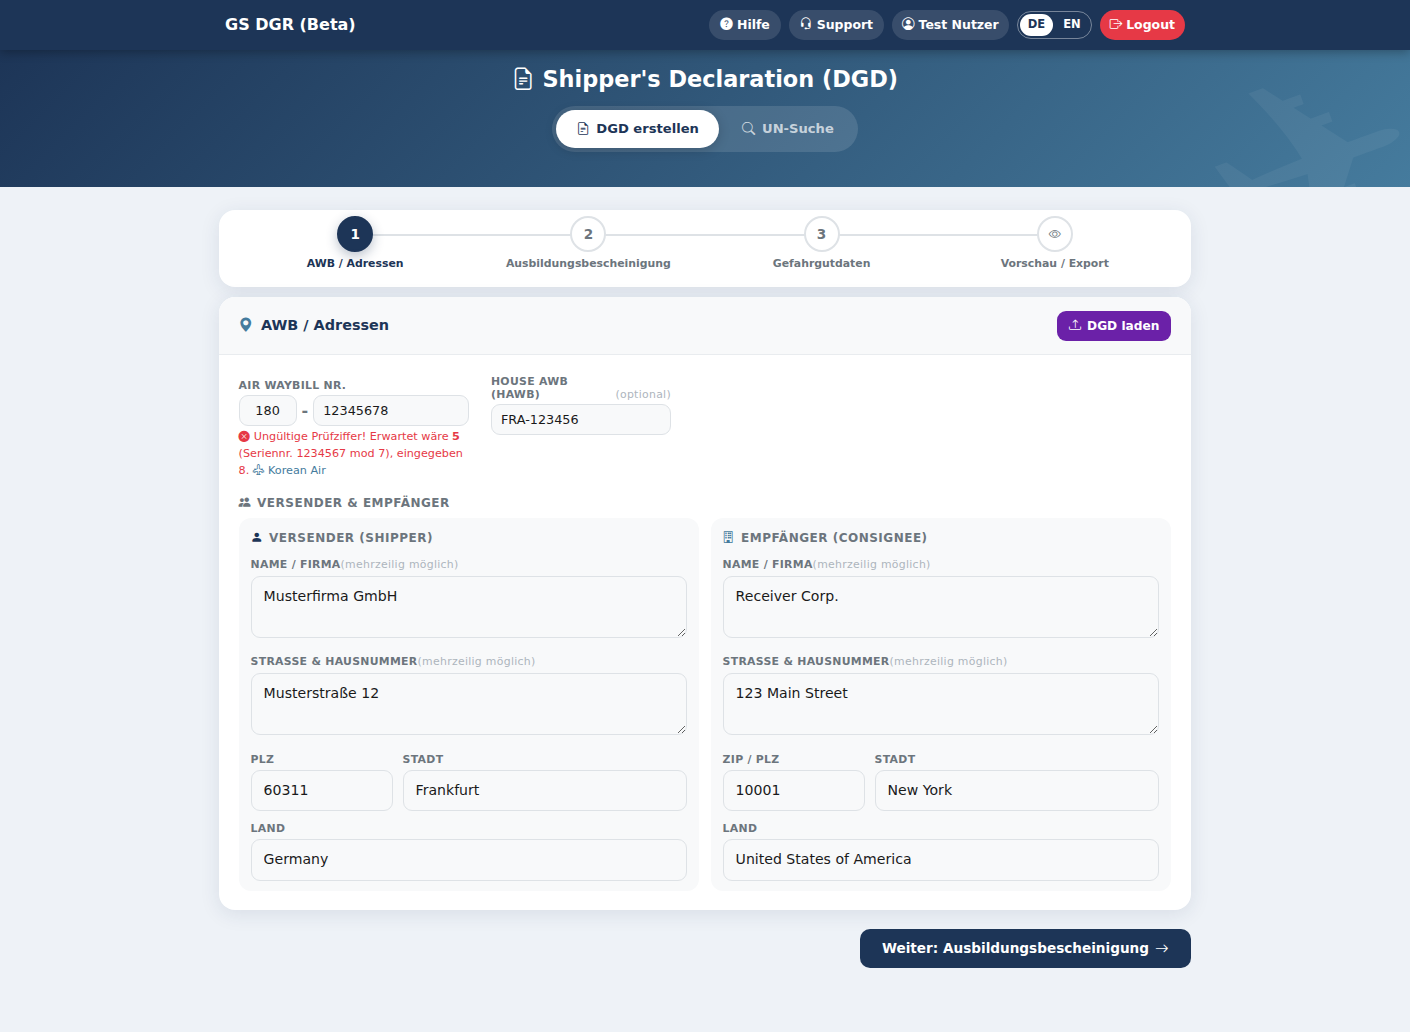
Switch to the Create DGD area — it starts automatically at step 1. Top right you'll find the Load DGD button, which lets you fully reload a previously exported DGD file (JSON) — including addresses, AWB number, and all dangerous goods entries.
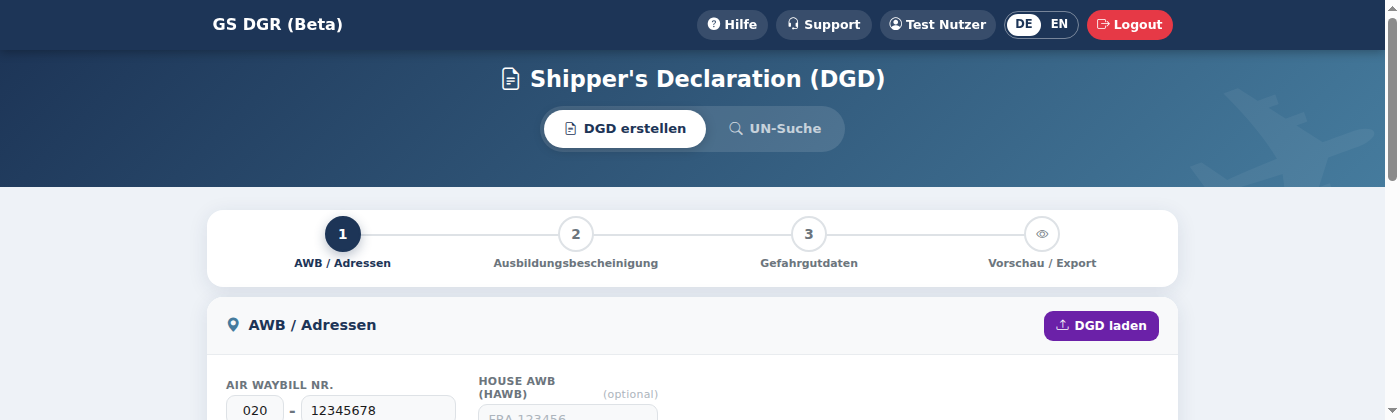
Enter the air waybill number (prefix + serial number). If there's also a house AWB (HAWB), enter it optionally next to it — it appears on the finished DGD right after the AWB number (e.g. 180-12345678/HAWB: FRA-123456). Below that, fill in the shipper and consignee addresses.
Step 2: Training certification
Airports, reference, 24h emergency number, and your signature details.
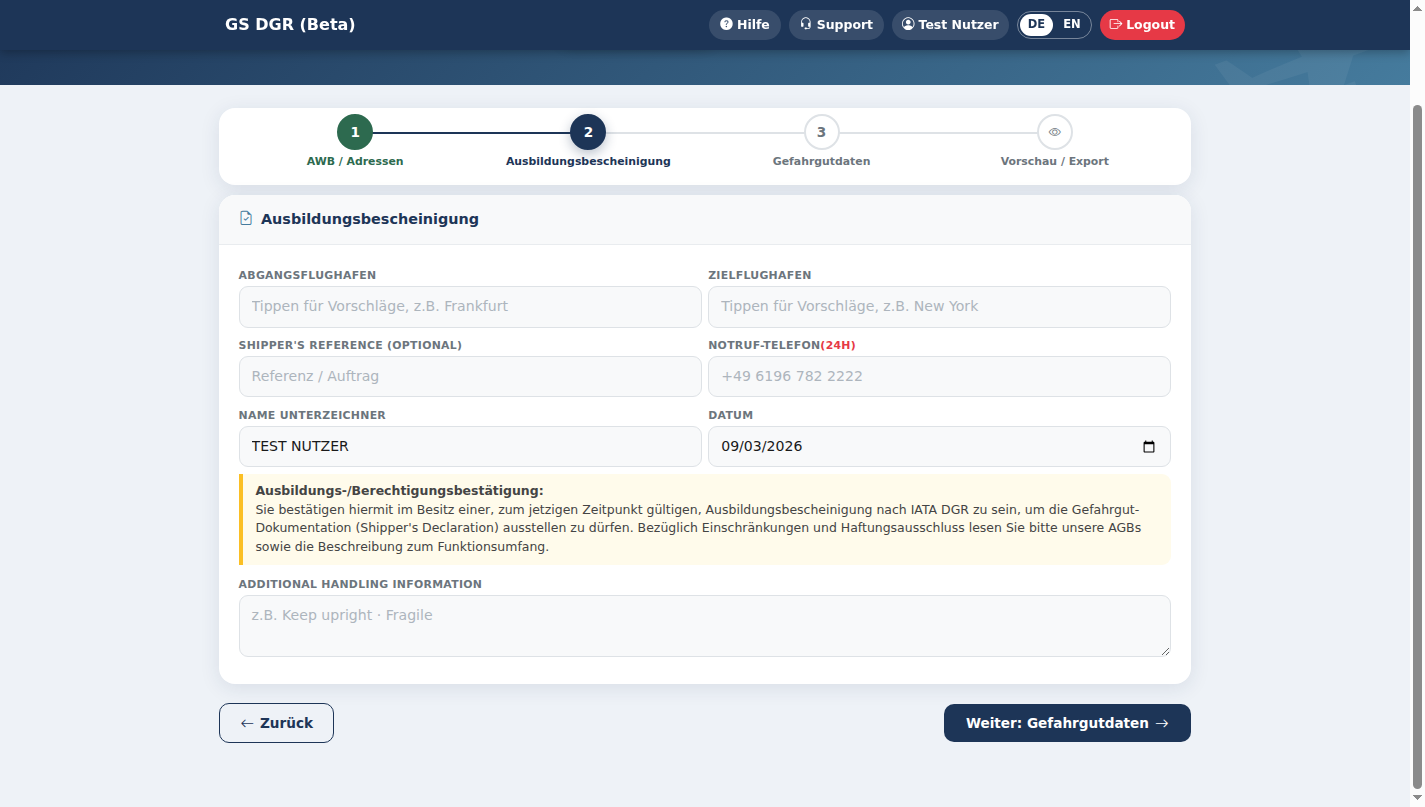
Here you enter the departure and destination airport (optional, but helpful), your own reference number, the mandatory 24h emergency number, plus name and date for the signature. The yellow notice confirms that you hold a valid training certification per IATA DGR.
Step 3: Add dangerous goods entries
The core of the DGD: every dangerous goods item with UN number, packaging, and quantity.
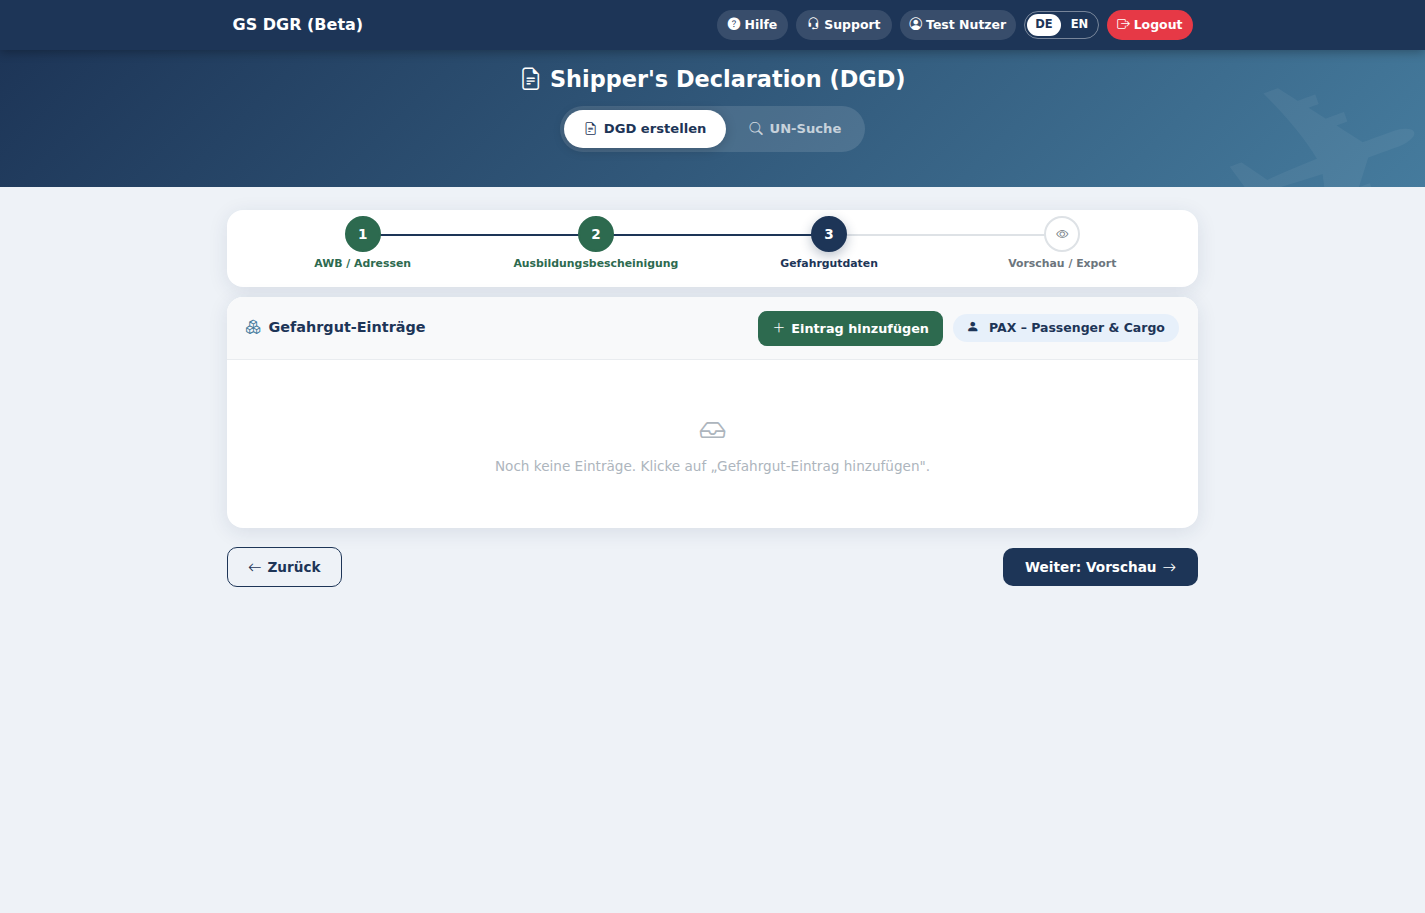
The list starts empty. Click Add entry to record the first dangerous goods item.
Search for the UN number
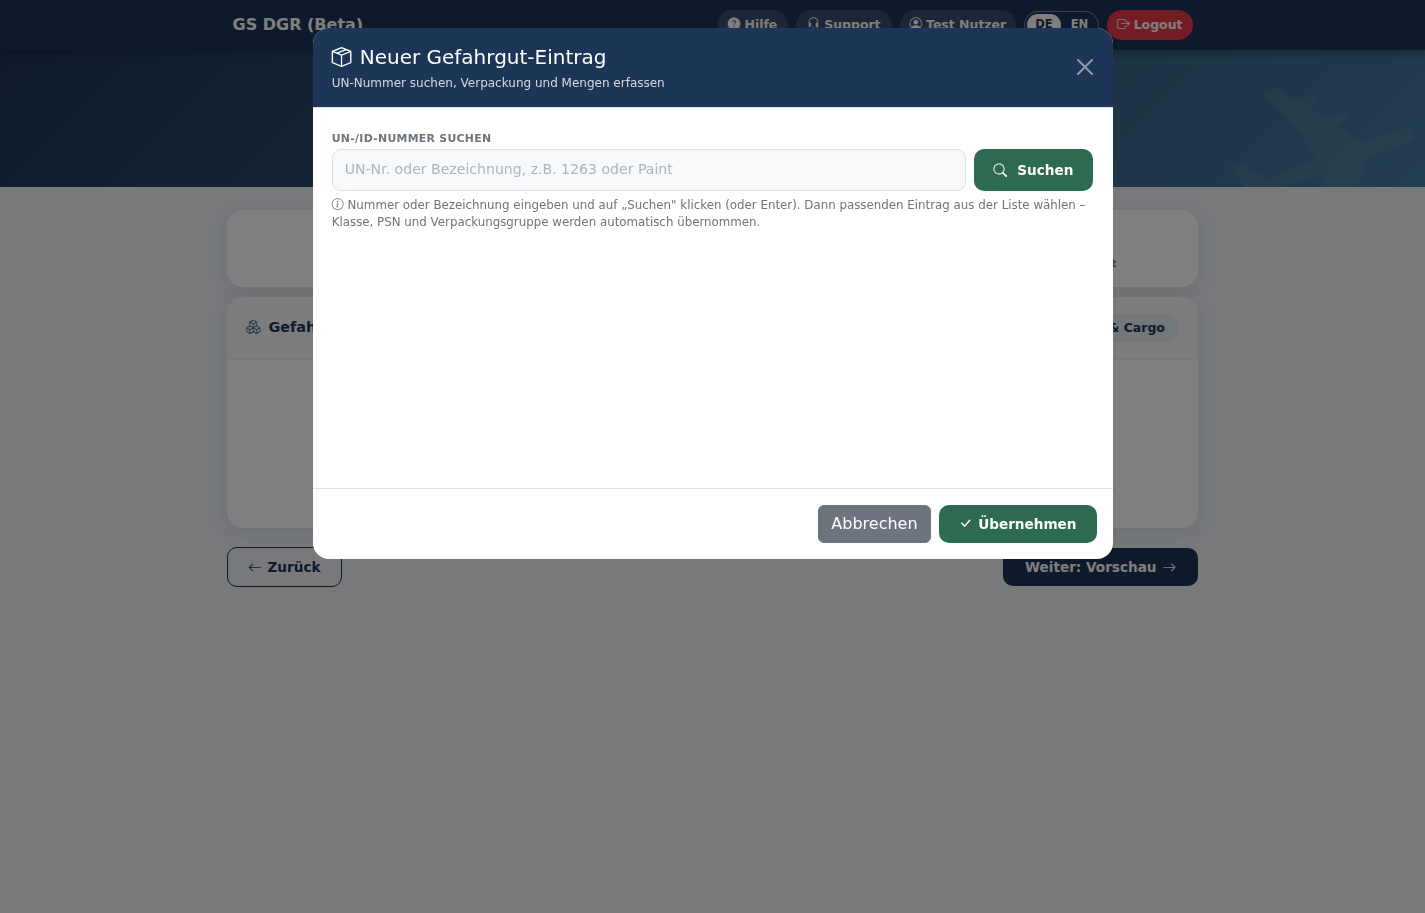
In the "New dangerous goods entry" modal, enter the UN number or part of the name and click Search. Pick the matching entry from the results list — class, proper shipping name, and packing group are taken over automatically.
Choose the packing instruction
Once the UN number is found, you'll see the available packing instructions as tiles (Y-packing, PAX, CAO) — each with its number and maximum allowed quantity. Clicking one decides which rule the shipment is packed under.
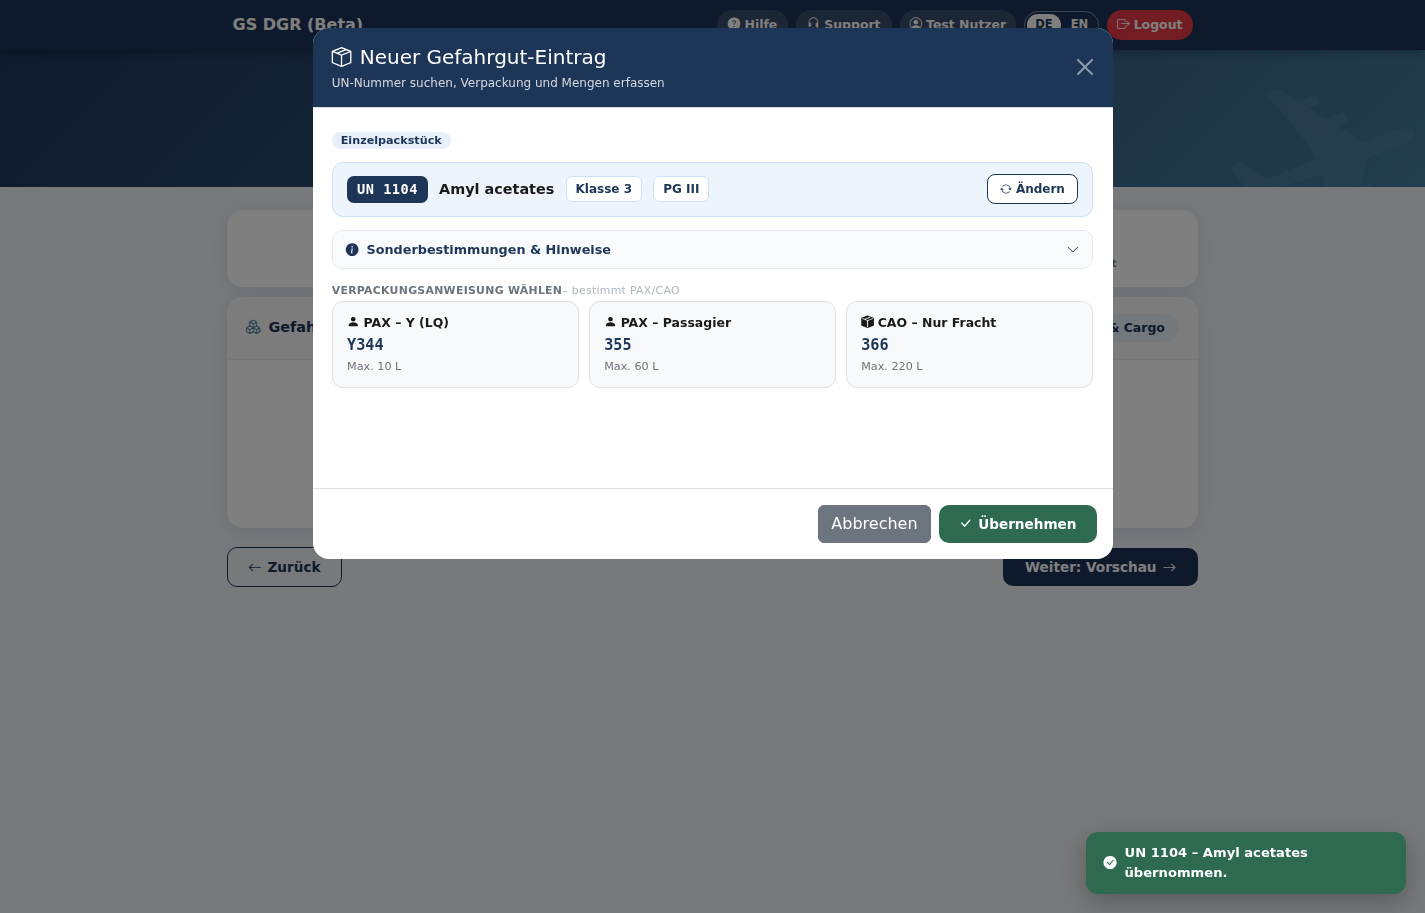
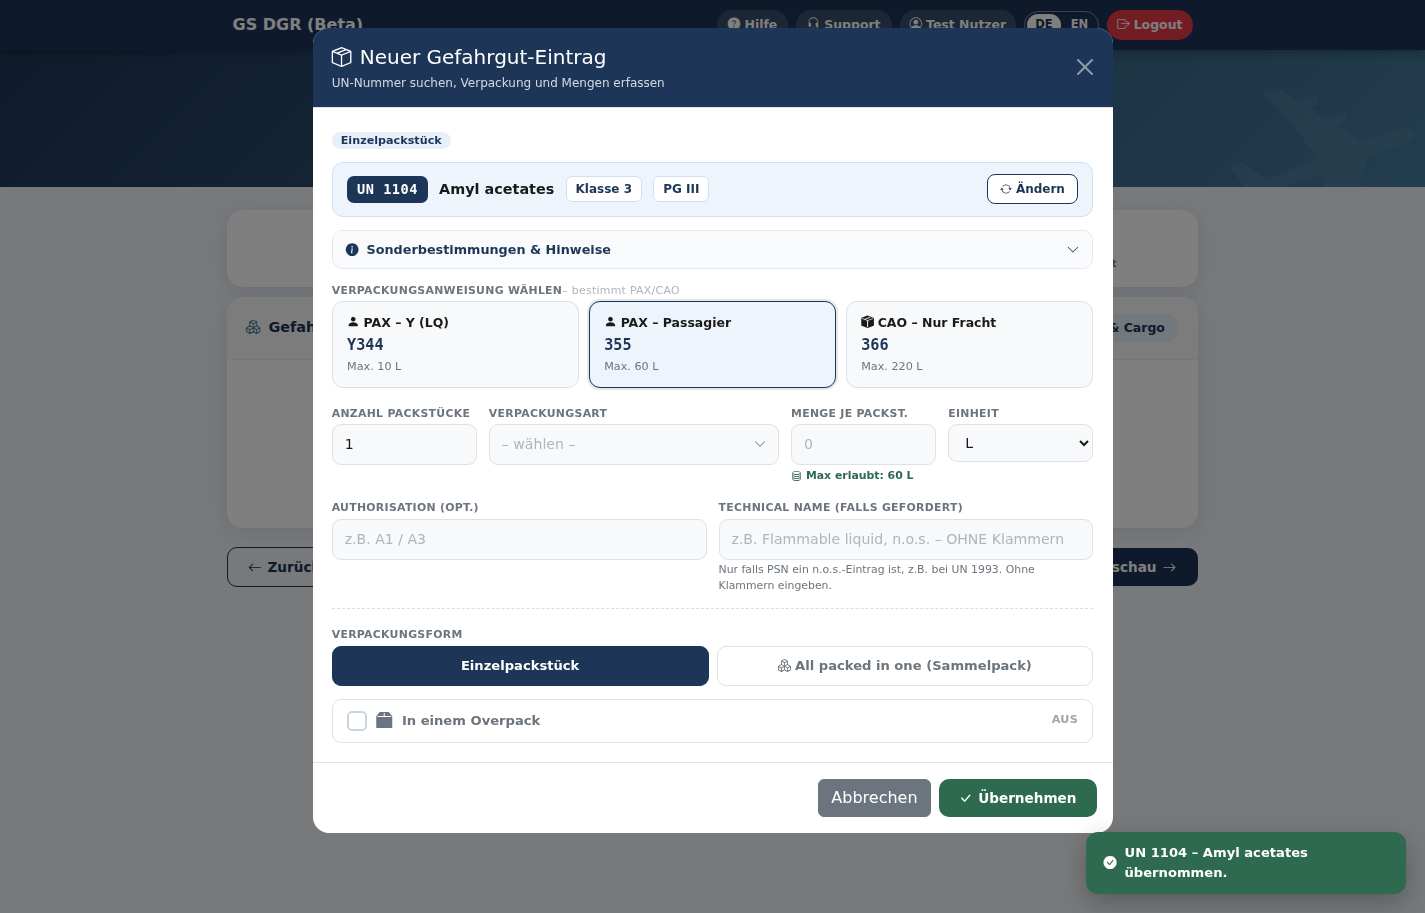
Quantity, packaging type & packaging form
Now enter the number of packages, quantity per package, and unit. For packaging type: if a list of allowed packagings is stored for the chosen packing instruction, clicking the field opens a selection window with four tabs instead of a simple dropdown.
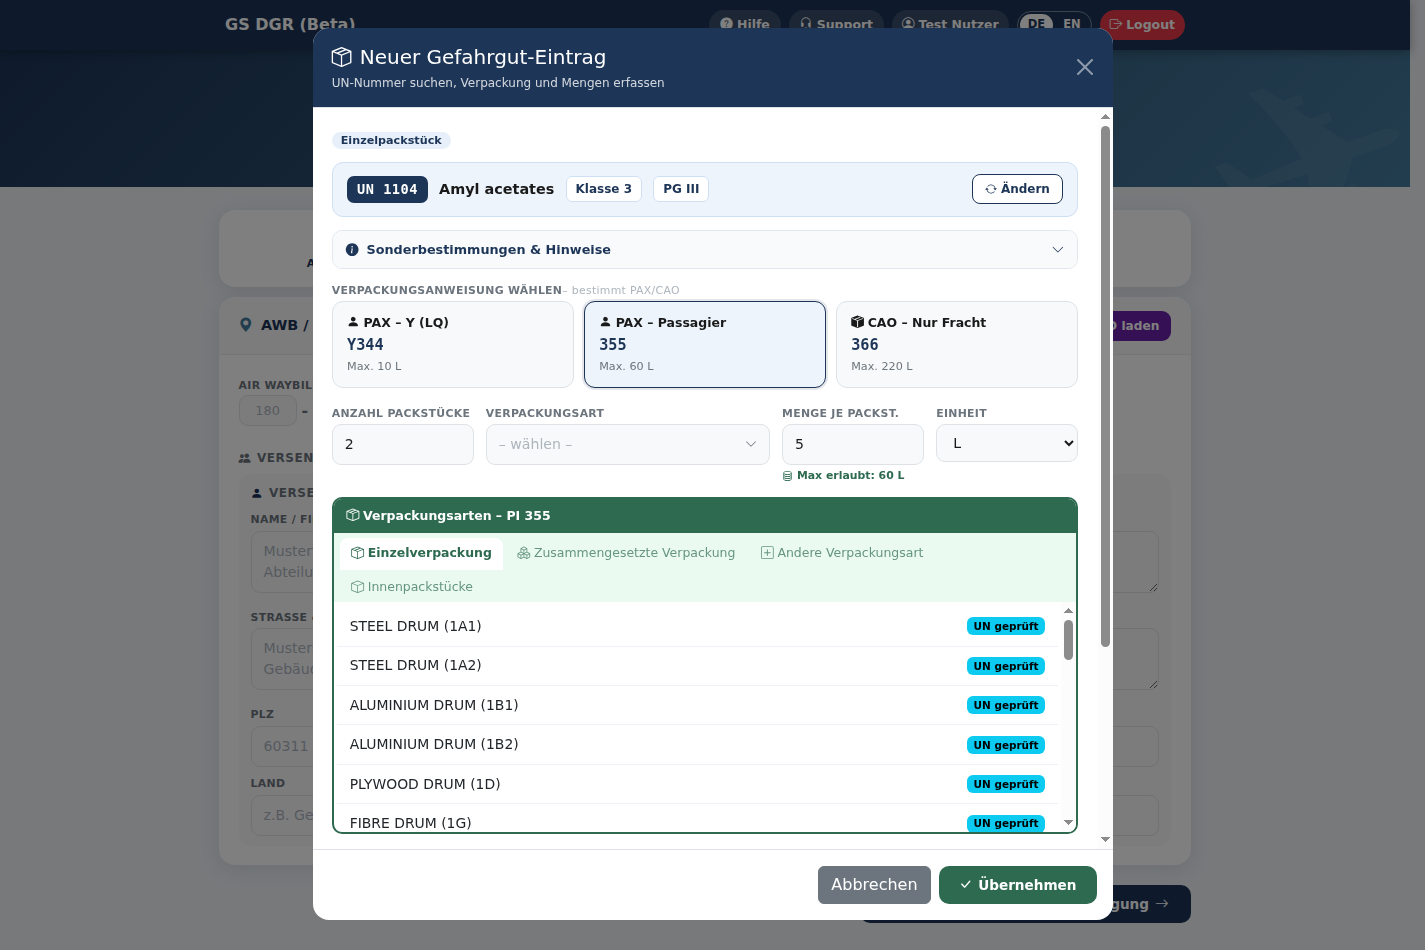
In the Other packaging tab you can enter an allowed packaging that isn't in the stored list: type it in and confirm with OK. An empty field is not applied.
At the bottom, you also set the packaging form: a normal single package, or "All packed in one" (overpack group) — several identical packages combined into one DGD line. An entry can additionally be marked as "In an overpack".
Then click Apply — the entry appears in the overview table. Use Add entry to add as many further items as you need.
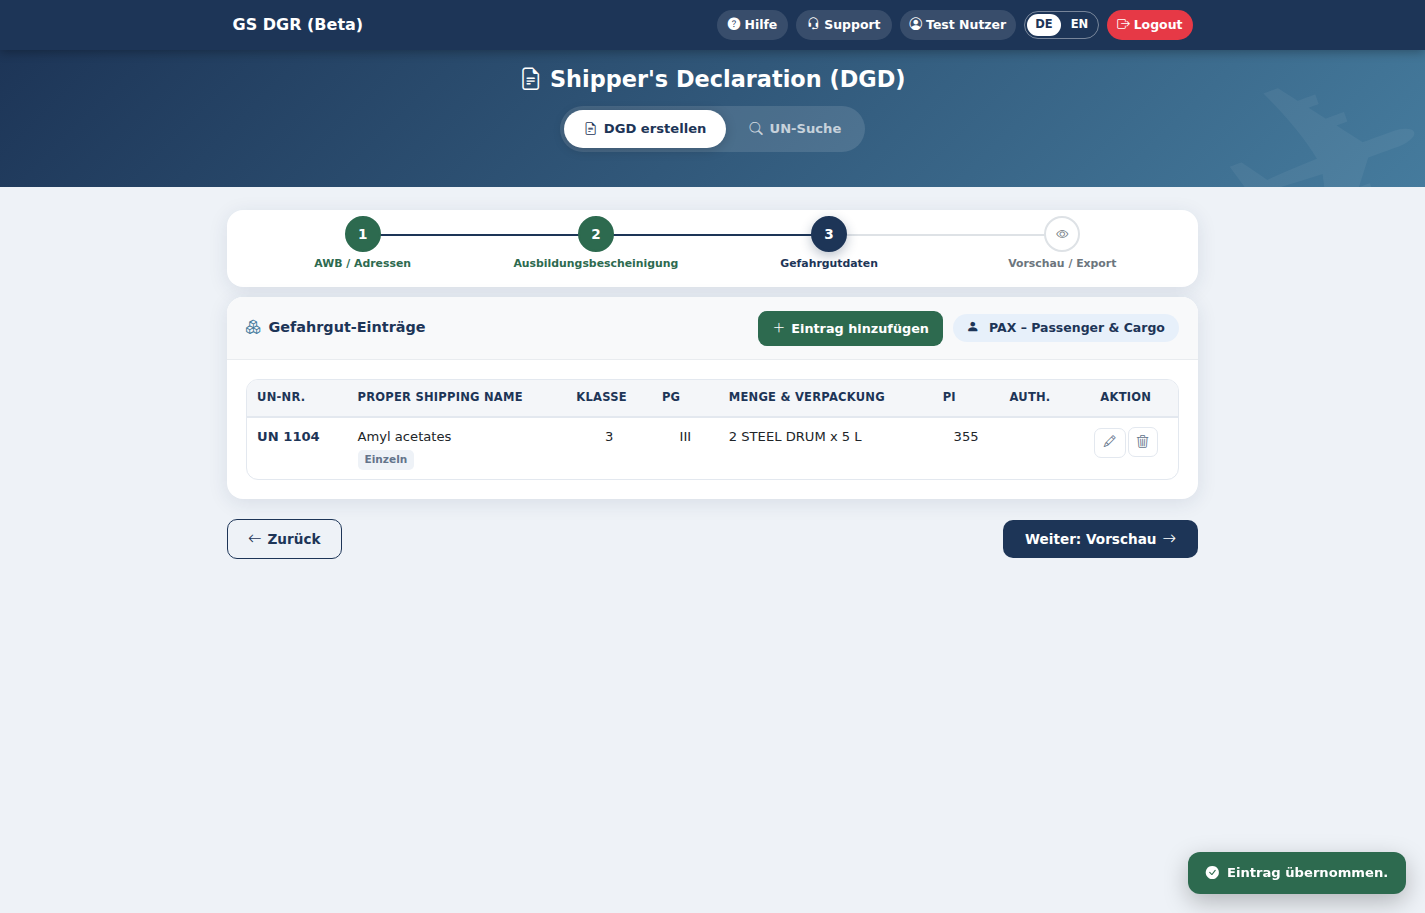
Step 4: Preview & export
Summary, PDF download, and saving as JSON.
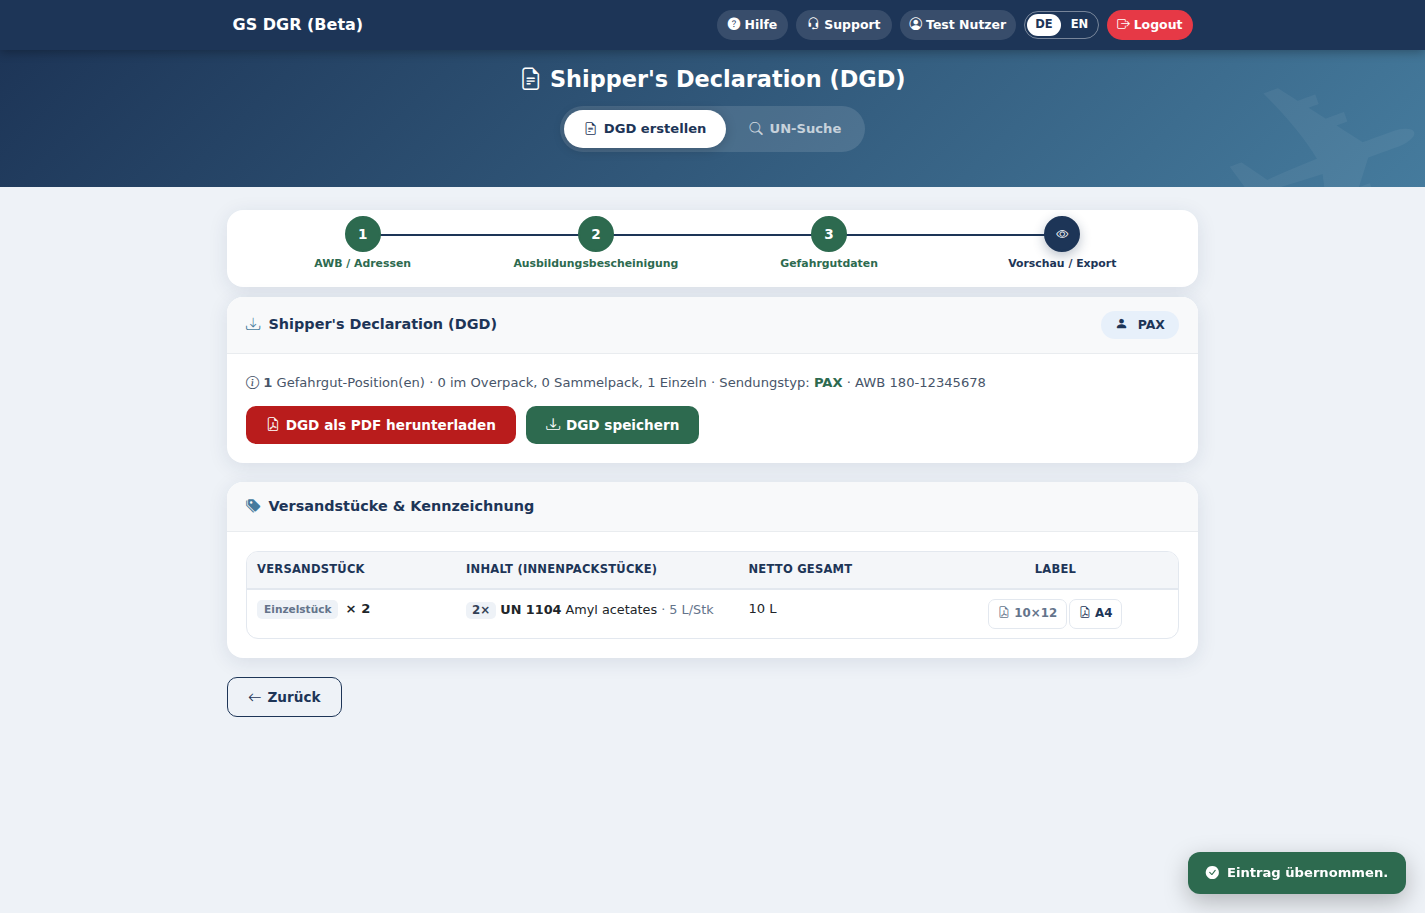
The last step summarizes the shipment (number of items, shipment type PAX/CAO, AWB) and shows the packages including their marking labels. The two buttons above let you download the finished DGD as a PDF or save the current state as a JSON file — handy for picking up exactly here later with "Load DGD" (step 1).
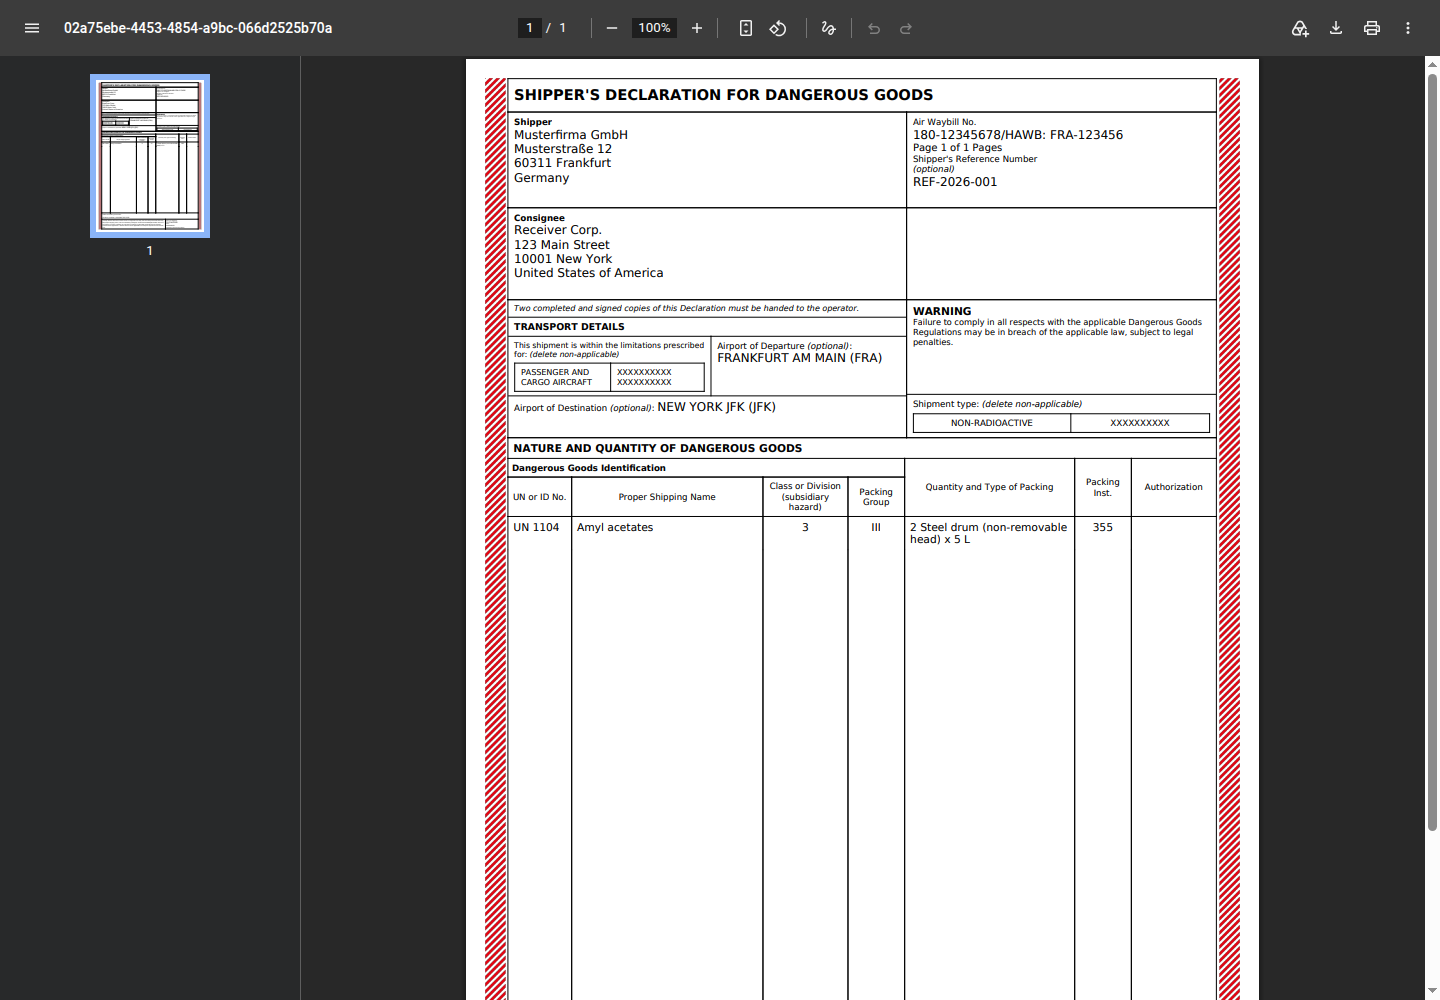
Clicking Download DGD as PDF opens the finished document as a PDF in a new browser tab — in the official IATA layout of the "Shipper's Declaration for Dangerous Goods":
Shipping labels (10×12 & DIN A4)
Besides the DGD itself, the app also generates the matching hazard labels for every package.
In step 4 (Preview / Export), below the DGD summary you'll find the Packages & labelling section. For every package — whether a single piece, an all-packed-in-one, or an overpack — the table lists its contents (UN number, proper shipping name, net quantity per inner packaging) and the total net quantity. On the right you can generate a matching label PDF for each package directly.
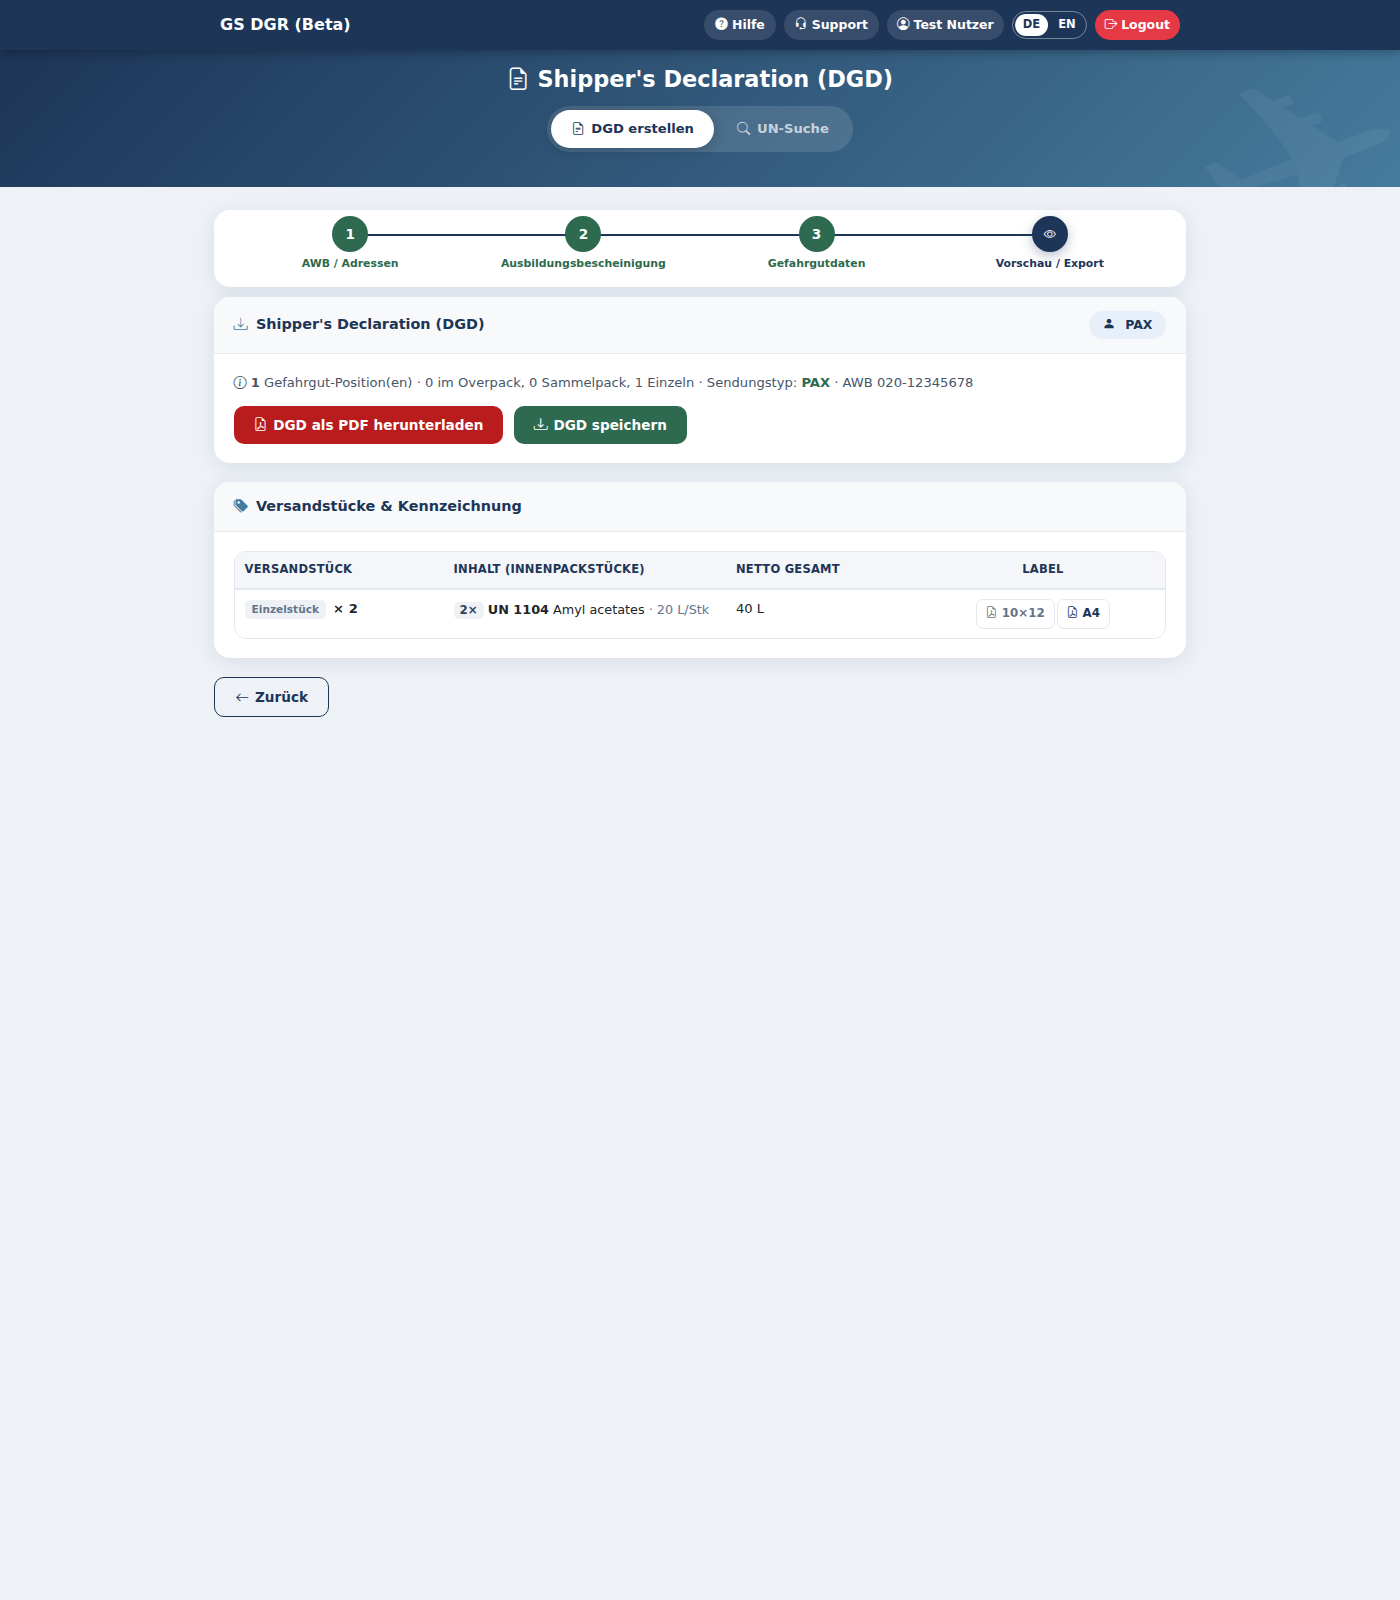
10×12 format (single label)
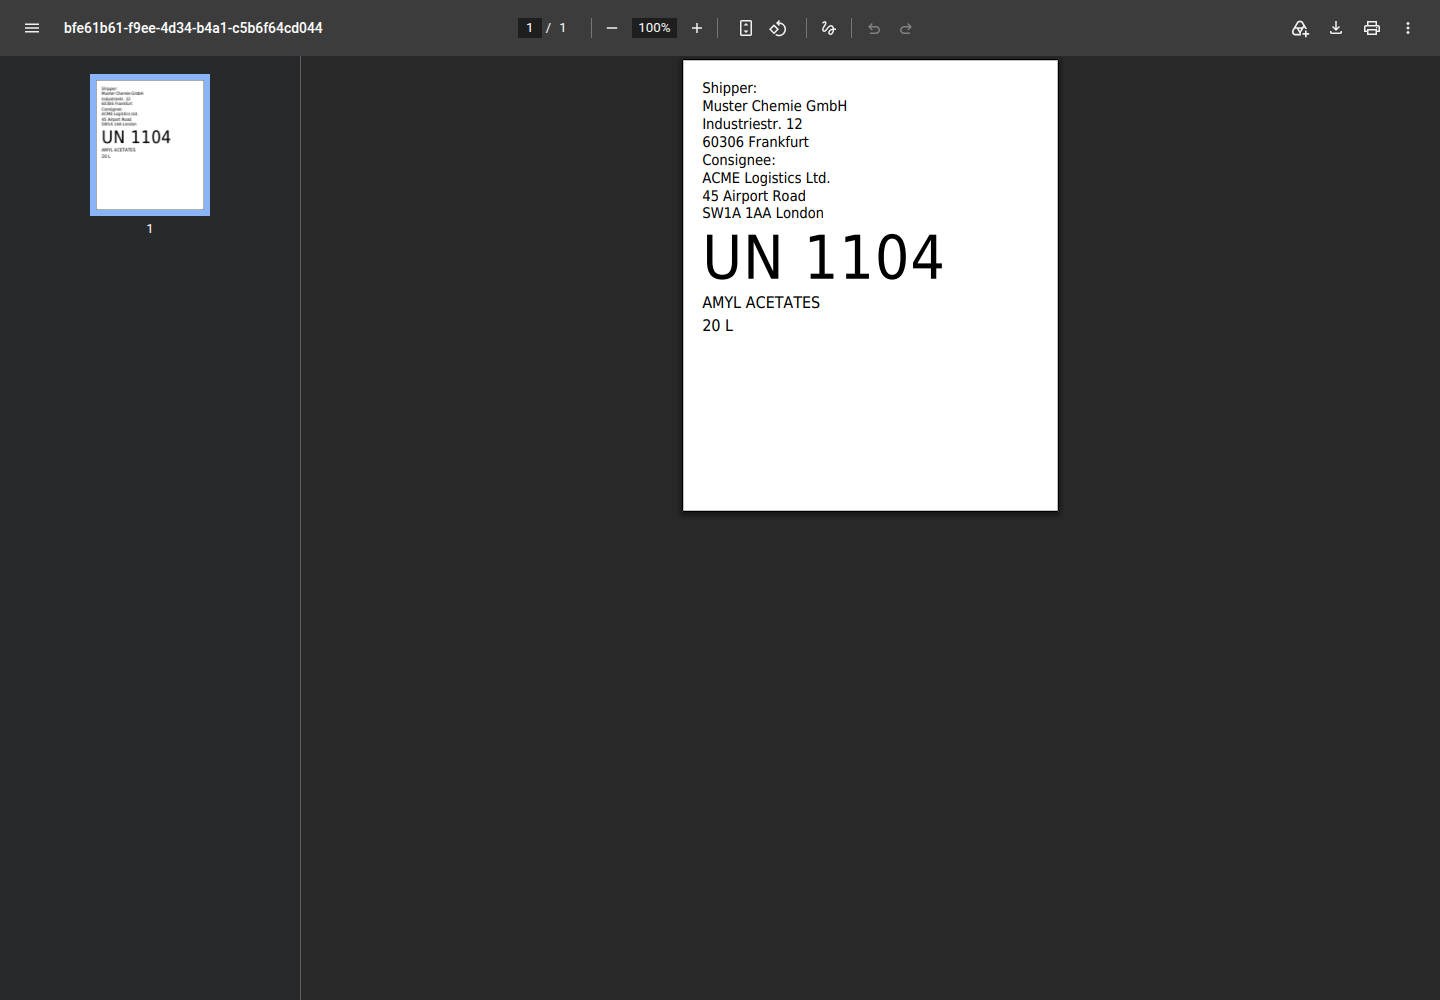
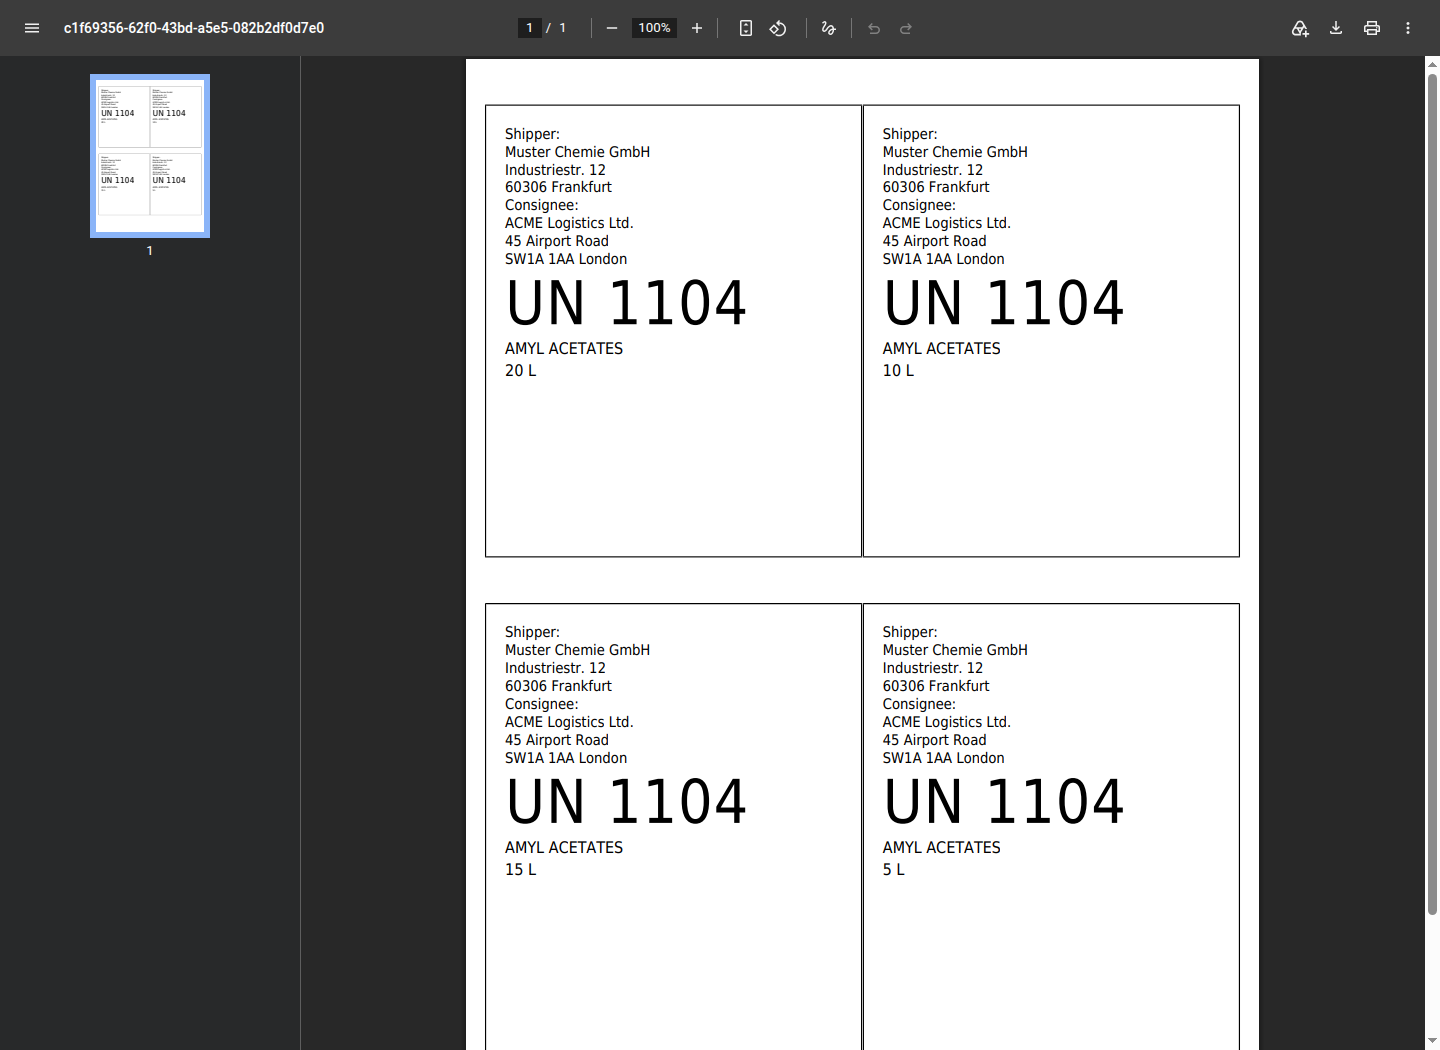
The 10×12 button instantly generates a finished PDF in the classic shipping-label format 100×120 mm — one label per page, with shipper/consignee address, UN number, proper shipping name and quantity — and opens it directly in a new browser tab, just like the DGD PDF.
DIN A4 format (4 labels per sheet)
The A4 button likewise generates a PDF directly, but arranges all of the shipment's labels four to a DIN A4 sheet instead (2×2 grid, more sheets if there are more than four packages) — handy when no label printer is at hand and you print on plain paper and cut them out instead.
Company admin: manage employees & licences
Only visible when you are signed in as your company's admin (Kundenadmin).
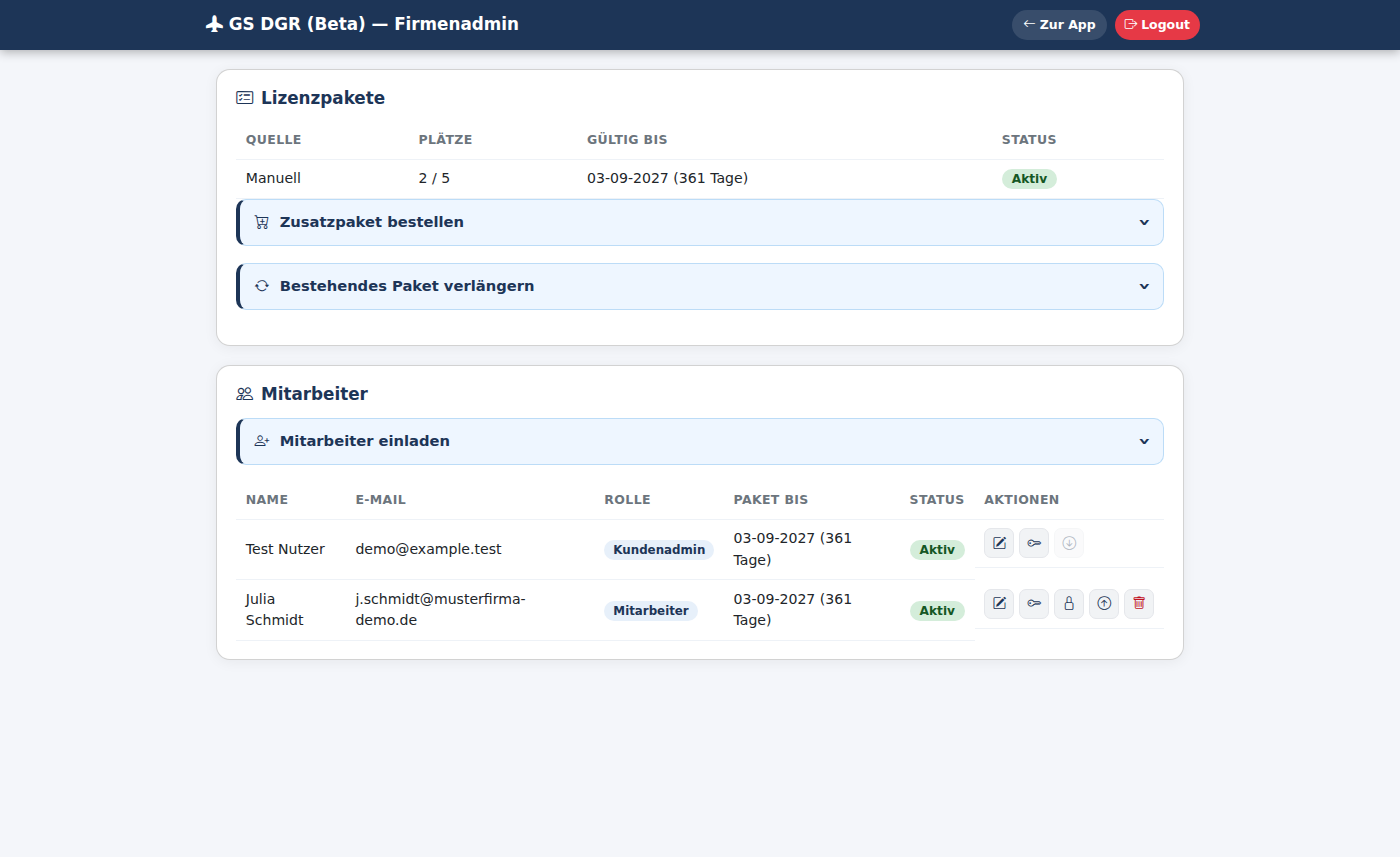
If you are your company's admin, you'll find a "Company admin" button at the top of the app. There you manage your company's licence packages and employees — this page is always reachable, whether your own licence is currently active or expired.
Invite an employee
Click the highlighted blue row "Invite employee" to expand the form. Enter first and last name, e-mail address and the desired licence package, then click Send invitation. The new employee receives an e-mail with a link to set their own username and password — a free seat in the chosen package is required.
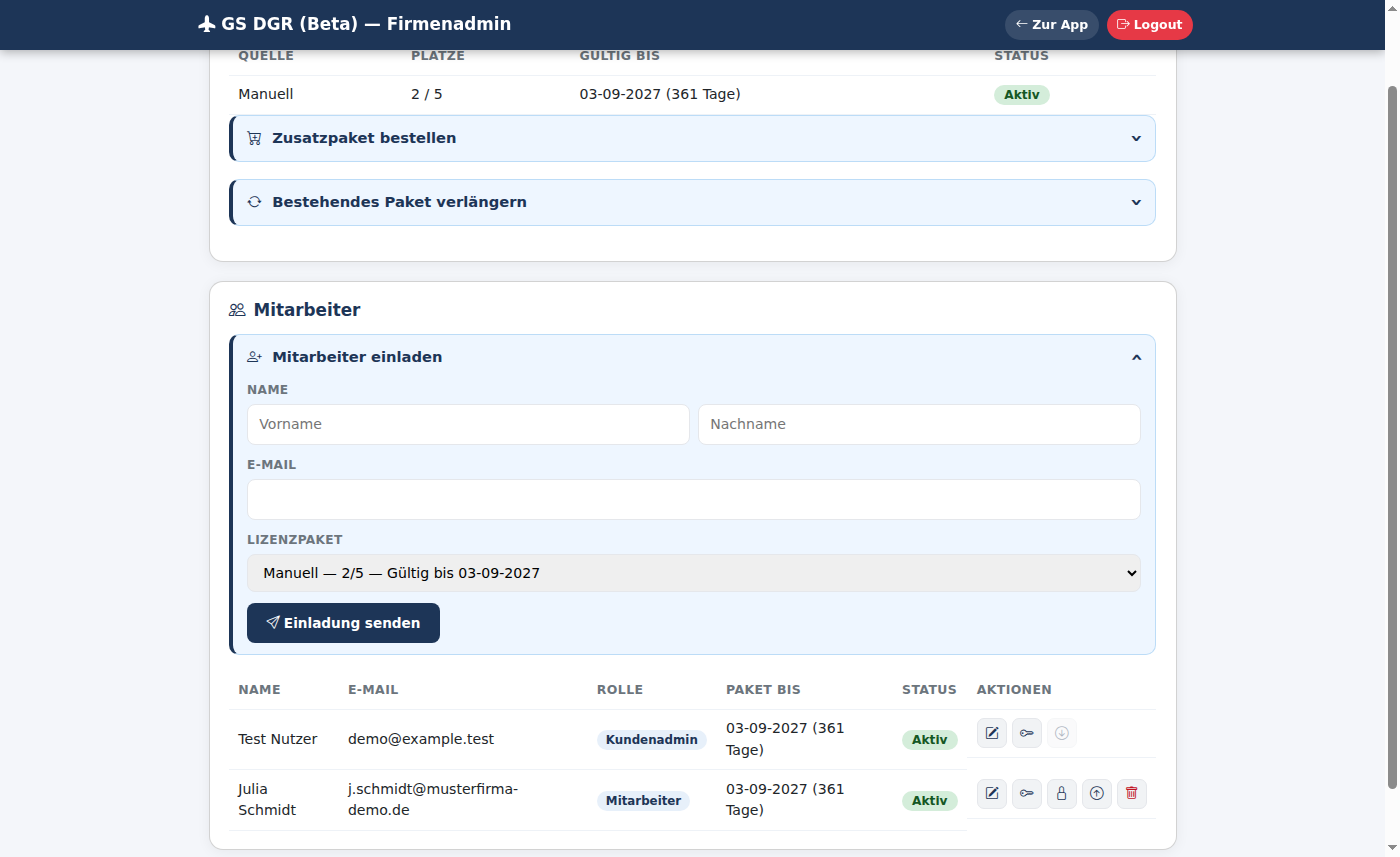
The same highlighted style is used for "Order additional package" (a further licence package for more employees) and "Renew existing package" (extend an existing package's term) — both work the same way: expand the row, fill in the details, submit the order. We review the order and activate the package afterwards.
In the employee list below, use the icons on the right to edit an employee, set a new password, lock/unlock, promote (or demote) to company admin, or remove them.
Frequently asked questions
- What's the difference between "all packed in one" and "overpack"?
- An "all packed in one" group combines several identical single packages of one item into a single DGD line. An overpack is an additional outer packaging that transports several (even different) packages together — both can be enabled independently for an entry in step 3.
- Why don't I see a selection window for some packing instructions?
- The tabbed selection window only appears when concrete allowed packagings are stored for that specific packing instruction (PI number). Otherwise, the packaging-type field stays a normal dropdown with the general list of packaging types.
- Can I continue a DGD I started earlier?
- Yes — use Save DGD in step 4 to save the complete current state as a JSON file. Use Load DGD in step 1 to fully reload it at any time, including all addresses, the AWB number, and all dangerous goods entries.
- What does "Radioactive – no DGD" or "Special provision – not possible" mean?
- This application currently doesn't support automatic DGD creation for radioactive materials, or for UN numbers referring to a special provision outside the standard packing instructions. In these cases, please consult a dangerous goods specialist.
- I can't find a UN number in the search — what should I do?
- First check the spelling (enter only the digits of the UN number, without leading zeros). If you still can't find it, reach out to your team via the support chat — the entry might still be missing from the reference database.
Support chat
More questions? The Support button at the top of the app opens the chat with your contact person — it's always available throughout your session, no matter which step you're on.